Google Docs remains one of the more popular document editing and management tools. You can sign in with your Gmail account and sync documents across all your devices, making Google Docs perfect for people who need to access their documents on the go.
Google Docs is also a web-based platform, meaning that you can write and edit Google documents from almost any device or browser.
Whether you’re new to Google Docs or have been using it for a while, there are likely many tricks that you didn’t know about. The following “secret” tips and tricks will make your life easier, help you be more productive, and save you time.
Without further ado, let’s get into it.
Explore what other tools you can use in place of Google docs.
23 Google Doc Tips & Tricks You Didn’t Know About
1. Use Google Docs Offline
I’m going to start with a simple but extremely useful tip. Many of you probably know this already, but some of you may be unaware that you can use Google Docs even without an internet connection!
Despite Google Docs being a web-based platform, you can use it in offline mode. Any changes you make will be automatically synced once you go back online.
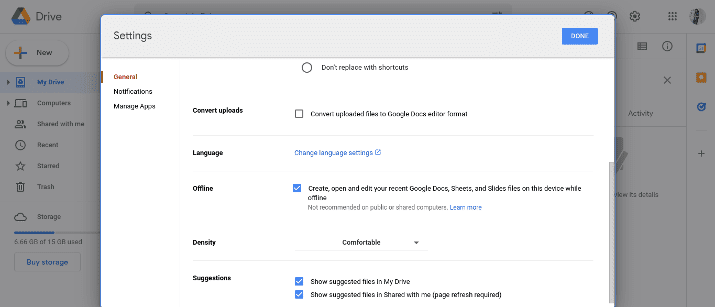
Google may ask you to allow offline usage if it’s your first time. You can also go to Google Drive and click on the settings icon in the top-right corner to allow offline access, as shown in the screenshot above.
Also Read: Best Online Document Comparison Software
2. Use Shortcuts to Save Time
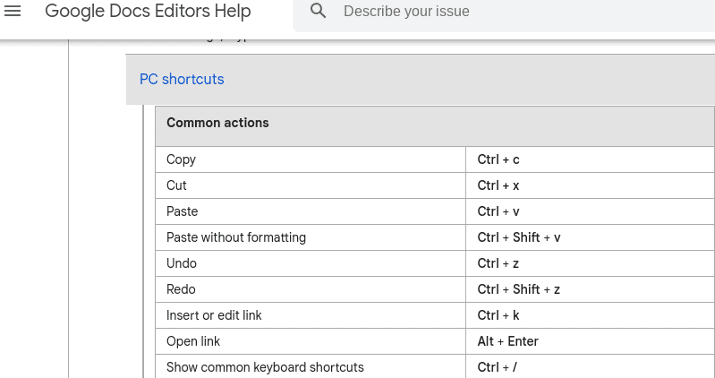
There are tons of shortcuts on Google Docs that will help you save time. For example, you can use CTRL + B for bolding.
You can either highlight a section and press CTRL + B to highlight the selected text or just press CTRL + B to turn bolding on and off for whatever you’re about to type next.
Changing header sizes is easy as well. Just press CTRL + ALT + the header size you want.
For example, CTRL + ALT + 1 will turn a line into an H1 header, while CTRL + ALT + 2 will turn it into an H2 header.
You don’t have to highlight the entire line, either. Simply put your cursor anywhere on the line and use the shortcut.
If you want to center-align a text, you can click on CTRL + SHIFT + E.
There are many more shortcuts available. Note that the exact shortcuts can vary slightly based on whether you’re on a Windows, Mac, Chromebook, Android phone, or iPhone/iPad.
For a full list of keyboard shortcuts for Google Docs for different devices, check this page.
3. Let Google Docs Search for a Link
When hyperlinking something, you don’t have to do a manual Google search, visit the website, and then copy and paste the URL.
Instead, you can let Google Docs do the work for you and search for the URL. Just highlight the text you want to hyperlink, and Google Docs will bring up a list of suggested URLs to insert.
If it’s a website or brand you’re referencing, Google Docs typically does a pretty good job of finding the correct URL.
Remember, you can press CTRL + K to insert a link.
Explore: Best Microsoft Word Alternatives
4. Set Substitution Preferences
Sometimes, you might want to enter a certain symbol or sign, but your keyboard doesn’t have that symbol. There’s a way to insert special characters and symbols into Google Docs, which I will cover in the next tip.
However, the process can sometimes take a bit longer than you’d like. Fortunately, though, you can set your own “shortcuts” and make Google Docs automatically substitute certain letters or symbols for others.
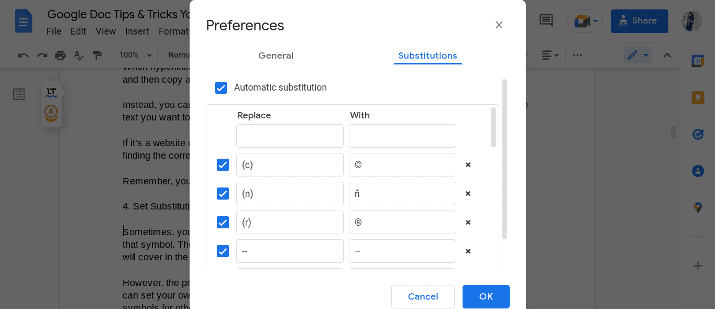
For example, by default, you may find Google Docs will substitute “(c)” for “©” – a useful tip when trying to put the copyright symbol in.
However, you can delete that substitution or make your own – for example, you can have Google replace “(n)” with “ñ” if you need to write words in Spanish, but your keyboard doesn’t have the ñ letter.
So, how can you do that?
Start by hovering your mouse over the “Tools” option in your top menu. Scroll down and select “Preferences.”
Then, click on “Substitutions.” you can now delete existing default substitutions or create your own.
Check Out: Best Open-source DocuSign Alternatives
5. Insert Special Characters
Regardless of which language or characters your keyboard supports, there is a plethora of other characters that you can insert into Google Docs.
They include check marks, symbols and letters from other languages and scripts (including European, Middle Eastern, Asian, and European scripts), shapes, and various other symbols.
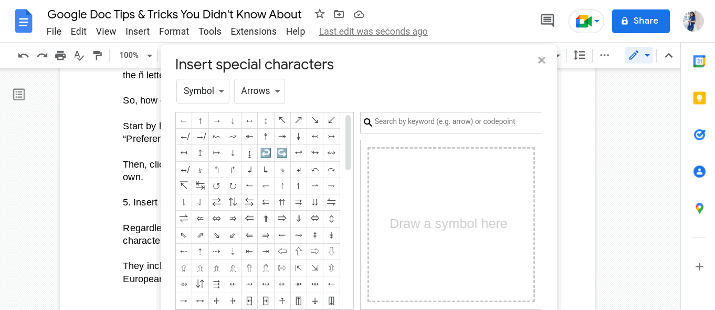
Simply hover your mouse over “Insert” in the top menu, and then click on “Special Characters.”
You can select a script or type of symbol from the drop-down menu, or you can type a keyword into the search bar to find the specific symbol you want. If you don’t know what the symbol or sign is called, you can even draw it on the drawing pad!
Also Read: Best WPS Office Alternatives
6. Show Document Outline
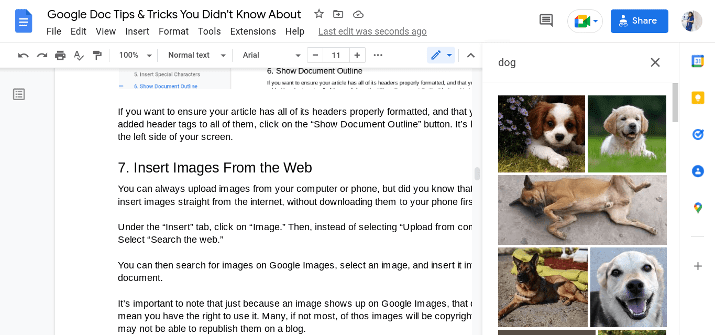
If you want to ensure your article has all of its headers properly formatted, and that you have added header tags to all of them, click on the “Show Document Outline” button. It’s located on the left side of your screen.
7. Insert Images From the Web
You can always upload images from your computer or phone, but did you know that you can insert images straight from the internet, without downloading them to your computer first?
Under the “Insert” tab, click on “Image.” Then, instead of selecting “Upload from computer,” Select “Search the web.”
You can then search for images on Google Images, select an image, and insert it into your document.
It’s important to note that just because an image shows up on Google Images, that does not mean you have the right to use it. Many, if not most, of those images will be copyrighted, so you may not be able to republish them on a blog.
8. Type Using Your Voice
There are many voice-to-text programs that allow you to talk into a microphone and have a software type your spoken words in real time.
However, did you know that you don’t have to install any third-party programs when you are using Google Docs? That’s right – Google Docs has a built-in speech-to-text software that you can use immediately.
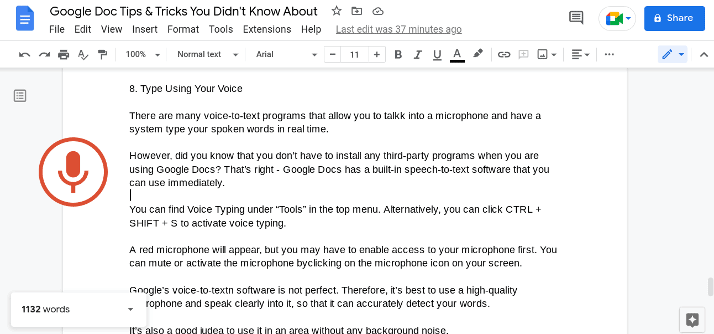
You can find voice typing under “Tools” in the top menu. Alternatively, you can click CTRL + SHIFT + S to activate voice typing.
A red microphone will appear, but you may have to enable access to your microphone first. You can mute or activate the microphone by clicking on the microphone icon on your screen.
Google’s voice-to-text software is not perfect. Therefore, it’s best to use a high-quality microphone and speak clearly into it, so that it can accurately detect your words.
It’s also a good idea to use it in an area without any background noise.
Explore: Best PDF Readers For Android
9. Set Sharing Controls
To share your Google Doc with others, click the blue Share button at the top-right of the screen.
You’ll get a link to share the document, but there are different privacy and security settings you can choose from.
For maximum privacy, only allow people you explicitly invite to access the document with the link. For less privacy, allow anyone who has the link to access the file.
You can also set different access levels for those who can access the document: viewing, commenting, and editing. If you enable editing, anyone who has access to the document will be able to make changes to it.
10. Publish to the Web
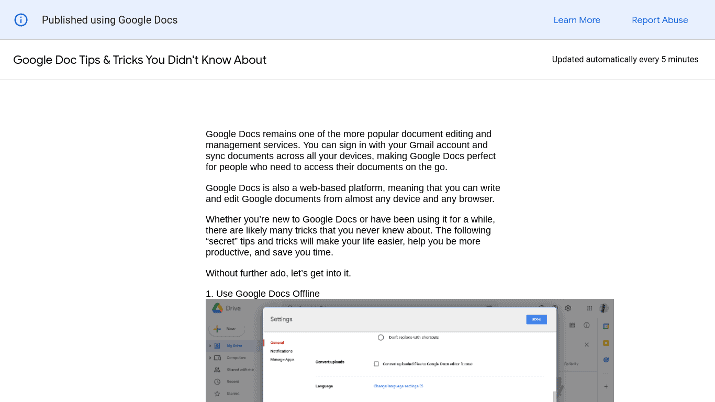
There’s another way to share your Google Doc: by publishing an online version of the document on the internet.
There’s a major difference between this method and the previous method. When using the previous method, people will have to enter Google Docs to read the article.
Since Google Docs is a web-based platform, most people will be able to access it without any problems and without needing to download additional software.
However, on mobile, it can be hard for some people to access it.
When the document is published to the web, it will appear as a blog post on Google Docs, complete with the images and links you added. Nobody will be able to make any changes while viewing the published version.
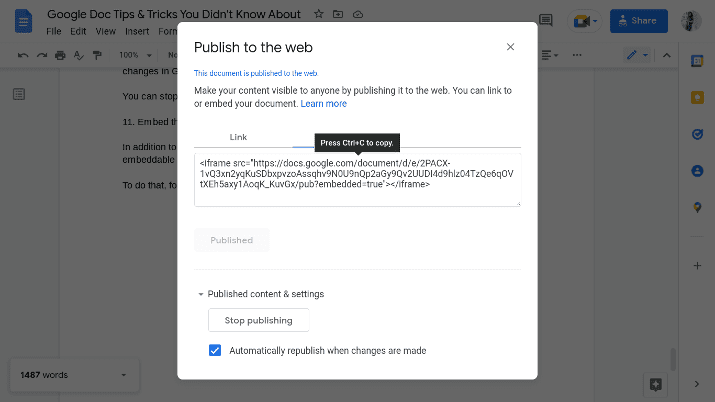
To do that, click on “Share” under “File” in the top menu. Then, click on “Publish to web.”
You’ll get a link to the online version of the document that you can share with others.
This online version is updated every few minutes. It’s a live document, so when you make changes in Google Docs, the changes will appear on the published version not long after.
You can stop publishing to take the online version off the web at any time.
Explore: Best InDesign Alternatives
11. Embed the Document
In addition to making an online version available, you can also get a short code for an embeddable version of the document, which you can embed in web pages online.
To do that, follow the same steps as above. After clicking “Publish to the web,” select “Embed” instead of “Link.”
Then, use the short code to embed the document in your blog post.
12. Use Google Docs With Google Meet
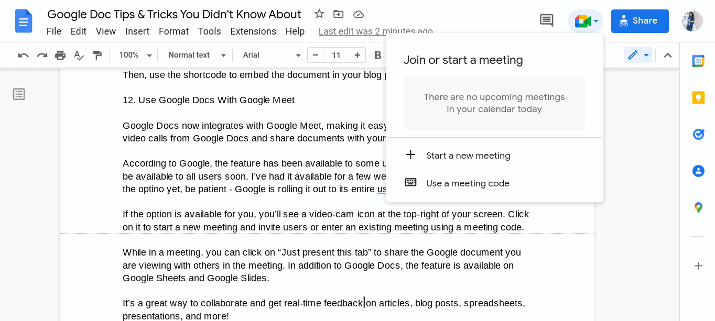
Google Docs now integrates with Google Meet, making it easy to join meetings or start new video calls from Google Docs and share documents with your colleagues in real time.
According to Google, the feature has been available to some users since April 2022, and it will be available to all users soon. I’ve had it available for a few weeks already, but if you don’t see the option yet, be patient – Google is rolling it out to its entire user base.
If the option is available for you, you’ll see a videocam icon at the top-right of your screen. Click on it to start a new meeting and invite users, or enter an existing meeting using a meeting code.
While in a meeting, you can click on “Just present this tab” to share the Google document you are viewing with others in the meeting. In addition to Google Docs, the feature is available on Google Sheets and Google Slides.
It’s a great way to collaborate and get real-time feedback on articles, blog posts, spreadsheets, presentations, and more!
13. Install Add-ons/Extensions
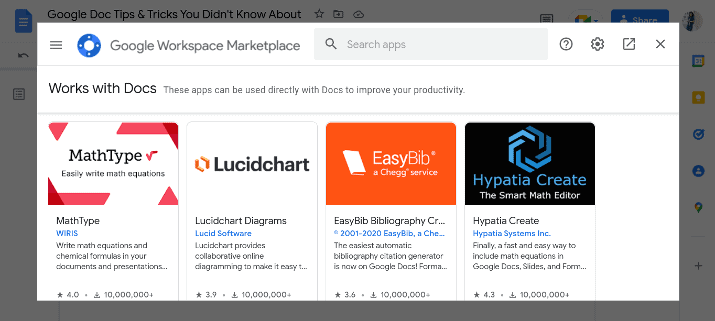
Not a lot of people know this, but Google Docs has an entire library of extensions and add-ons that you can install on Google Docs to increase your productivity and make your life easier.
Click on “Extensions” in the top menu, then click on “Add-ons.” To get new extensions, click on “Get add-ons.”
Some of the extension that I find useful include:
- Docs Paragraph Translate: Translate paragraphs into different languages using Google Translate.
- Easy Accents – Docs: Add accents from different languages, even when your keyboard doesn’t support them (for example, the accented e in café).
- Highlight Tool: This is a complete highlighting tool for Google Docs.
- SpellRight: Use this alternative spellchecker if English is your second language.
- Pixabay Free Images: Insert copy-right free images from Pixabay directly into Google Docs.
- PlagiarismCheck.org: Check your articles for instances of plagiarism to ensure originality and delete duplicate content.
- Power Thesaurus for Google Docs: Find synonyms to avoid overusing common words.
There are many other extensions you will find useful, whether you are a writer, teacher grading their students’ work, or editor. Browse the most popular extensions or use the search bar to find one that works for your needs.
14. Email a Document
Did you know that you can send your document as an email attachment?
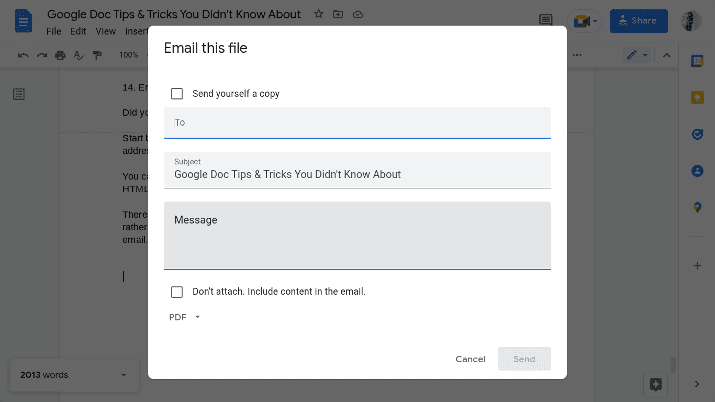
Start by clicking on “File,” then on “Email” and “Email this file.” You can then enter a recipient address, draft a subject line, and add an email body before sending the email.
You can also select from different attachment types, like Open Document, Microsoft Word, and HTML. If you want, you can send a copy to your own email address as well.
There’s another option, too. If you don’t want to send the document as an email attachment but rather send the entire document in the email body, select “Don’t attach. Include content in the email.”
15. Draft an Email in Google Docs
Another cool trick: You can write an email from Google Docs and then preview and send it from Gmail.
This is entirely different from what I just talked about. You’re not sending the actual document, but rather writing a regular email while working in Google Docs.
It allows you to take advantage of the Google Docs spell checker and other tools while writing your email, helping you perfect them.
You can do that by clicking on “Insert,” then “Building Blocks,” and then “Email draft.” You’ll be able to write your email and then send it in Gmail by clicking on the blue-white Gmail icon on the left side.
16. Insert Other Building Blocks
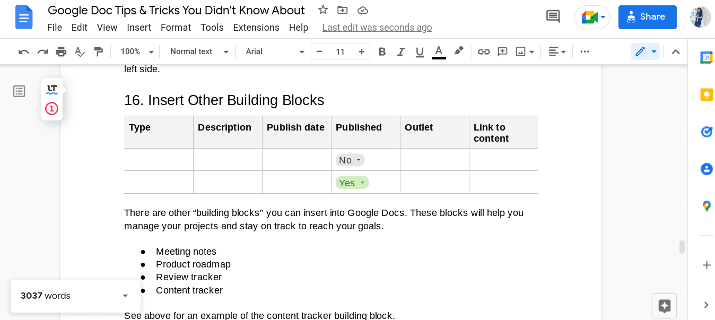
There are other “building blocks” you can insert into Google Docs. These blocks will help you manage your projects and stay on track to reach your goals.
They include:
- Meeting notes
- Product roadmap
- Review tracker
- Content tracker
See the screenshot above for an example of the content tracker building block.
17. Add Citations
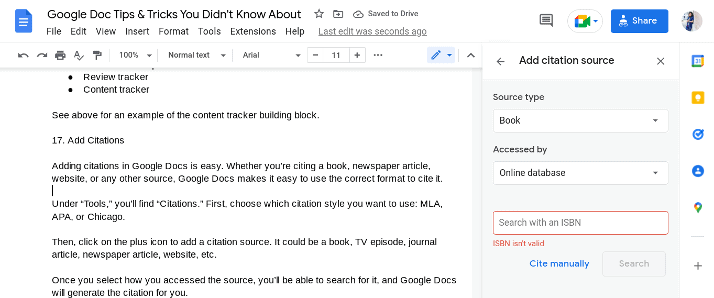
Adding citations in Google Docs is easy. Whether you’re citing a book, newspaper article, website, or any other source, Google Docs makes it easy to use the correct format to cite it.
Under “Tools,” you’ll find “Citations.” First, choose which citation style you want to use: MLA, APA, or Chicago.
Then, click on the blue plus icon to add a citation source. It could be a book, TV episode, journal article, newspaper article, website, etc.
Once you select how you accessed the source, you’ll be able to search for it, and Google Docs will generate the citation for you.
18. Find and Replace
If you spelled the name of a brand, product, or website wrong throughout an article, and you only realized after you finished the article, don’t despair. You don’t have to comb through the article and search for every instance of the word that you misspelled and correct it manually.
Instead, just use the find and replace tool. CTRL + F will bring up the find tool, which allows you to find every instance of a word mentioned in the document.
Click on the three dots to open up the find and replace tool. Type the word you want to replace and the word you want to replace it with.
If you select the box that says “Match Case,” the tool will only search for instances with the uppercase or lowercase letters you specify. It’s useful in case you wrote the name of a city or person without capitalizing the first letter.
Then, click on “Replace All.”
19. Add Scripts
I previously mentioned installing add-ons, but you can also create your own script to automate your workflows, connect with third-party apps, and increase your productivity. You can do that under the “Extensions” tab in the top menu.
Using Apps Script, you can also publish your add-on to the add-on store, so others can use it as well.
For a more comprehensive guide on how to use Apps Script, see here.
20. Download the Document
I already explained how you can share a document with others, publish it to the web, or email it. However, did you know that you can also download the document as a PDF file or another file format and then send it as an email attachment or in a WhatsApp message?
Under “File” in the top menu, select “Download.” Then, select one of the download options, such as PDF, TXT, or Microsoft Word.
The download will start automatically, and the file will be saved to your computer. It’s a great way to share articles and other documents with people who use word processors other than Google Docs.
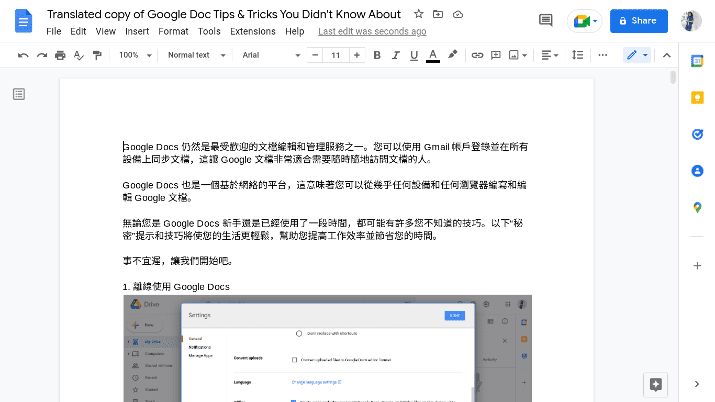
21. Translate a Document
While you can install an extension to help you translate specific paragraphs, you don’t need any add-on if you want to translate the entire document into another language. You can find this option under “Tools” in the top menu.
Simply select “Translate document” and then pick the language you want to translate it into from the drop-down menu.
This tool is powered by Google Translate. While Google Translate is perfect for some languages, it isn’t as good as a human translator for other languages, especially less common languages and certain language families.
Therefore, never rely completely on Google Translate, especially for important things. If you plan on publishing the translated copy online, consider having a native speaker edit it first.
In the screenshot above, you can see an example: this document translated into Chinese.
22. Use a Third-Party Spelling and Grammar Checker
While Google Docs has a built-in spell checker that even corrects basic grammar mistakes, it isn’t as advanced as some third-party spellcheckers. There are various spell checkers that come as Chrome extensions and support Google Docs.
Two spelling and grammar checkers that I like are LanguageTool and Grammarly. Both have Chrome extensions, and both support Google Docs.
They can be a bit glitchy on Google Docs, but they’re getting better.
You can turn Grammarly or LanguageTool on and off at will, and you can use them in conjunction with Google Doc’s built-in spell checker.
23. Use the Paint Roller to Transfer Formatting
The paint roller tool allows you to “copy and paste” formatting from one section of the article or one paragraph to another.
Start by highlighting the sentence, section, or paragraph with the formatting you want to transfer. Then, click on the “Paint Format” button.
Then, select the section you want to transfer the formatting to and click on it. The font, text size, and other formatting rules you transferred will be applied.
Wrapping It Up
There are many more secret Google Docs tips and tricks, but this article is limited and can’t cover all of them.
Just realize that even if you use Google Docs every day, there are probably buttons, tools, and functions you never thought to check out.
Don’t be afraid to try different tools, menu options, and buttons to see what they do. You may find a useful hack that will make your life a lot easier.

Benjamin Levin is a digital marketing professional with 4+ years of experience with inbound and outbound marketing. He helps small businesses reach their content creation, social media marketing, email marketing, and paid advertising goals. His hobbies include reading and traveling.
